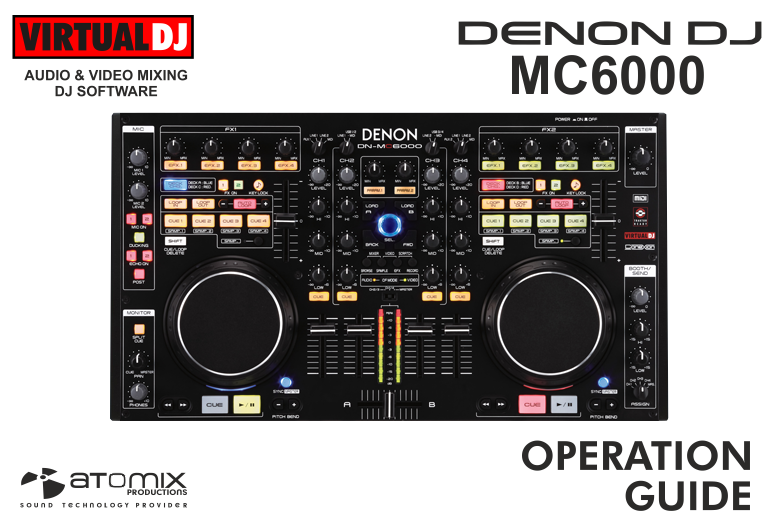
DENON DJ MC-6000
 for VirtualDJ 8.2+ Last Update : August 2019
SETUP
Firmware & Drivers
Windows Driver: Install the Denon ASIO driver from
https://www.denondj.com/downloads#legacyMac OSX Driver: Drivers are not required for Mac OS X computers.
Firmware: Update the
firmware of the unit to the latest version
https://www.denondj.com/downloads#legacyPreparing the device.
Look carefully at the rear side of your device.
Locate the 3 USB Mode switchers on the back.
Depending on your device's silkscreen, if it looks like figure 1, then
- Set A switcher on PC or MAC position depending on your OS.
- Set B switcher (USB AUDIO IN) to MASTER/CUE position.
- Set C switcher (USB AUDIO OUT) to REC OUT/MIC position.

Figure 1
If it looks like figure 2, then
- Set A switcher on PC or MAC position depending on your OS.
- Set B switcher (MIXING MODE) to PC MIX position.
- Set C switcher (OUTPUT SOURCE) to REC OUT/MIC position.

Figure 2 VirtualDJ Setup
Download and install VirtualDJ 8 from https://www.virtualdj.com/download/index.html (in case you have not done already)
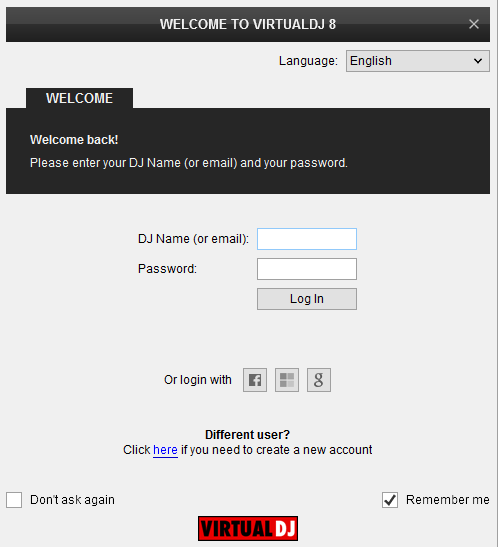
Once VirtualDJ is launched, a Login Window will appear. Login with your virtualdj.com account.
A Pro Infinity, PLUS or Pro Subscription License is required to use the Denon MC6000. Without any of the above Licenses, the controller will operate for 10 minutes each time you restart VirtualDJ .
https://www.virtualdj.com/buy/index.html
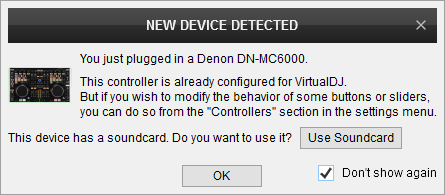
 A detection window will appear next, asking to use or not the pre-defined audio setup with the built-in sound card of the MC6000. You can still change that from Settings->AUDIO tab.
Click on the "Use Soundcard" button and then OK.
The unit is now
ready to operate.
Midi Operation
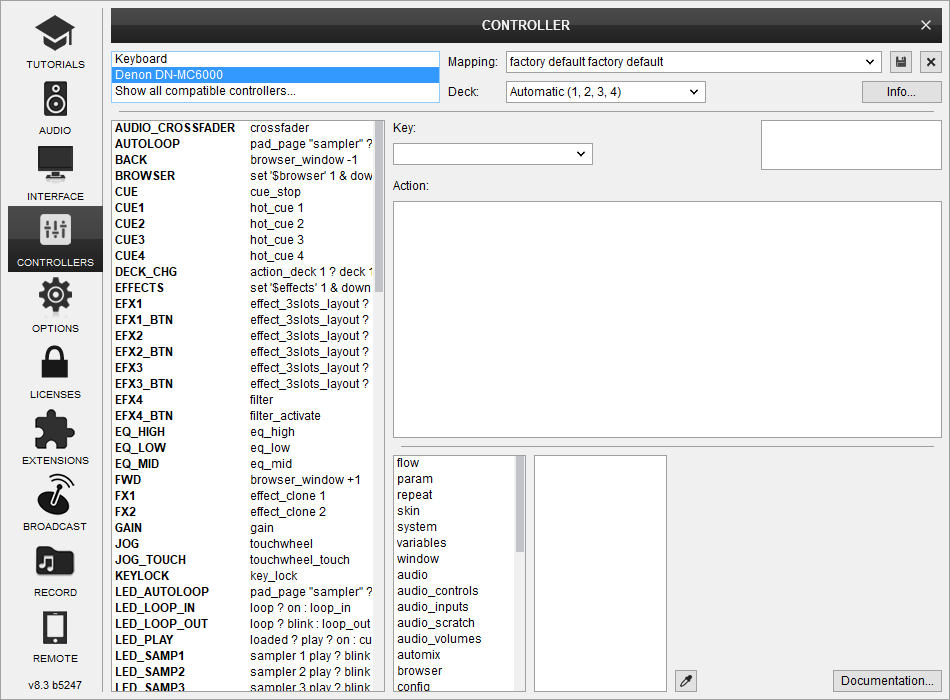
The unit should be visible in the CONTROLLERS tab of Config and the “factory default” available/selected from the Mappings drop-down list.
The factory default Mapping offers the functions described in this Manual, however those can be adjusted to your needs via VDJ Script actions.
Find more details at
https://www.virtualdj.com/wiki/VDJ8script.html
AUDIO SETUP
The unit has a pre-defined Audio setup and a special button in the AUDIO tab of Config to provide that. Alternative Audio setups can be applied in the same window (see Advanced Audio Setup).
Please read the manual of the unit for further connections/capabilities and setups.
http://b06ba727c886717f9577-fff53f927840131da4fecbedd819996a.r74.cf2.rackcdn.com//1216/documents/DN-MC6000_ownersmanual.pdf
For further VirtualDJ settings and features please refer to the User Guide of VirtualDJ 8.
https://www.virtualdj.com/manuals/virtualdj8/index.html
LAYOUT
S SHIFT: Hold this button down to access secondary functions of Denon MC-6000 (mainly inside a white box)

The functionality of each button, knob and slider per section (as shown in the image above) will be explained in detail in the next chapters
MIXER
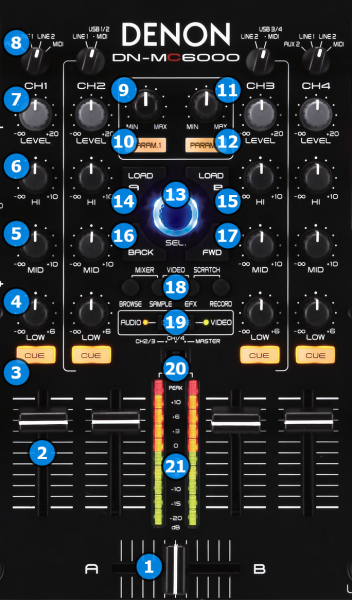
- CROSSFADER: Blends audio (or video, or both) between the channels assigned to the left and right side of the crossfader.
- VOLUME: Volume Faders (mixer channel order is 3-1-2-4 decks). Note that the faders will not alter the sound of the corresponding software deck, if the INPUTS switchers are on LINE/AUX positions, but the sound of the software decks will still go through the Master Output.
- PFL: Press these buttons to send this channel's pre-fader signal to the Cue Channel for monitoring. When engaged, the button will be lit.
- EQ LOW: Adjusts low (bass) frequencies of the corresponding channel in the software or hardware Input.
- EQ MID: Adjusts the middle (mid) frequencies of the corresponding channel in the software or hardware Input.
- EQ HI: Adjusts the high (treble) frequencies of the corresponding channel in the software or hardware Input.
- GAIN: Adjusts the audio level (gain) of the corresponding channel in the software or hardware Input. For software, the 0db gain position is the 12 o' clock position.
- INPUT SELECTOR: Set this switch to the desired audio source for this channel: MIDI (a track playing on that layer in the software), LN1/2/AUX1/2 (a device connected to the Line / Aux Inputs on MC6000 rear panel).
Note: The software deck will still be outputted on Master Output if the switcher is on LINE / AUX positions.
- PARAM 1: Use this knob to select the desired Video Transition. Hold down SHIFT and turn this knob to adjust the first parameter of the selected video transition (if offered)
- PARAM 1 BUTTON: Push this button to activate a Video Transition between left and right decks. Hold down SHIFT and push this button activate a momentary video transition (the transition will take place for as long as you hold the button pushed)
- PARAM 2: Use this knob to select the desired Master Video Effect. Hold down SHIFT and turn this knob to adjust the first parameter of the selected master video effect (if offered)
- PARAM 2 BUTTON: Push this button to activate the Master Video Effect. Hold down SHIFT and push this button to momentary activate the master video effect (effect will be active for as long as you hold the button pushed)
- BROWSE:
Turn: Scrolls through Folders or Files. Hold SHIFT down and turn this encoder to scroll through the library in larger steps.
Push: If focus is on the Folders List, push the encoder to enter to the Songs List or hold SHIFT down and then push the encoder to expand/collapse Subfolders.
If focus is on the Songs List, push the encoder to load the selected track from the Songs List to the Automix List or hold SHIFT down and then push the encoder to load the selected track from the Songs List to the Sidelist.
- LOAD A: Press this button to load the selected track from the Browser to the left deck. Hold this button for more than 1 second to unload the left deck.
Hold SHIFT down and press this button, to load the other deck of the same side (if deck 1 is the left deck then load deck 3). Hold this button for more than 1 second (while still holding SHIFT button) to unload the other deck of the same side (if deck 3 is the left deck, then unload deck 1)
- LOAD B: Press this button to load the selected track from the Browser to the right deck. Hold this button for more than 1 second to unload the right deck.
Hold SHIFT down and press this button, to load the other deck of the same side (if deck 4 is the right deck then load deck 2). Hold this button for more than 1 second (while still holding SHIFT button) to unload the other deck of the same side (if deck 2 is the right deck, then unload deck 4)
- BACK: Sets focus to the previous Browser Window. Hold SHIFT down and press this button to select the previous Sideview List.
- FWD: Sets focus to the next Browser Window. Hold SHIFT down and press this button to select the next Sideview List.
- BROWSER/SKIN VIEW:
[list]- BROWSE: Press this button to set focus to the next Browser Window. Hold this button down and press the SAMPLE button to activate the "MIXER" central panel of the Default skins.
- SAMPLE: Press this button to show Sampler window of the VirtualDJ Browser. Hold this button down and press the EFX button to activate the "VIDEO" central panel of the Default skins.
- EFX: Hold this button down and press the RECORD button to activate the "SCRATCH" central panel of the Default skins.
- RECORD: Press this button to start/stop recording of your mix.
[/list]
- CF-LINK: Each time this button is pressed, the CROSSFADER (1) will control the Audio, the Video or both crossfaders of VirtualDJ. The leds on the sides of the button indicate the selected mode.
Note: If the LINK (Video Crossfader Link action) from the VIDEO center panel of the default skin of VirtualDJ is enabled, the crossfader of the MC6000 will still control both audio and video crossfaders even if the CF-LINK button is on the AUDIO position.
- VU-METER CH SELECT: Use this switch to select which channels are visible on the VU-METERS (21).
- VU-METERS: When the VU-METER CH SELECT switcher (20) is on the MASTER position, the VU meters will show the Output Volume of the Master Output, and they will show the Output Level of the corresponding deck if the switcher is on the CH positions.
HARDWARE MIXER ELEMENTS
All the elements on the above picture
operate in hardware level. This means that the MC6000 firmware is responsible for operating these elements. Some of these elements offer MIDI notes and they can be used for your own mapping needs. These elements are not used in default mapper of VirtualDJ.
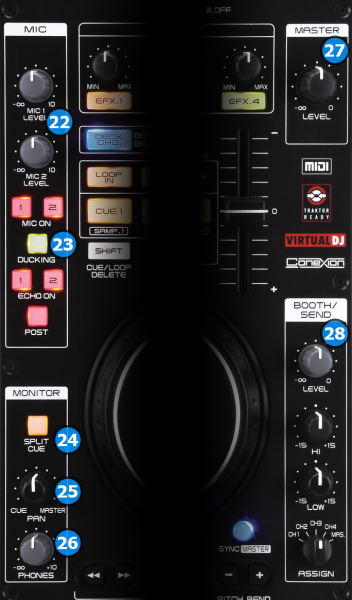
- MIC LEVEL 1/2: Adjust the volume of the two MIC inputs of Denon MC6000
- MIC CONTROL:
[list]- MIC ON 1/2: Turn ON/OFF the corresponding MIC input.
- DUCKING: Turn ON/OFF ducking for the MIC inputs (lower other channels volume when you talk on the MIC, also known as talk-over).
- ECHO ON 1/2: Turn ON/OFF an echo effect on the corresponding MIC input.
- POST: Use the echo effect of the MIC's as a post fader effect (echo trailing may keep heard even if you switch MIC's off until the effect fades out completely)
[/list]
- SPLIT CUE: Split headphones mix so that channel mix is on the right side and master mix is on the left side of your headphones.
- HEADPHONES MIX: Mixes the headphones audio between channel mix (all the way to the left) and master mix (all the way to the right).
- HEADPHONES VOLUME: Adjusts the volume of your headphones.
- MASTER VOLUME: Adjust the master volume output of the unit.
- BOOTH/SEND CONTROLS:
[list]- BOOTH LEVEL: Adjust the booth output volume.
- BOOTH EQ HI: Adjust the high frequencies of the booth output.
- BOOTH EQ LOW: Adjust the low frequencies of the booth output.
- BOOTH ASSIGN: Adjust which channel will be send on the booth output.
[/list]
DECK CONTROLS
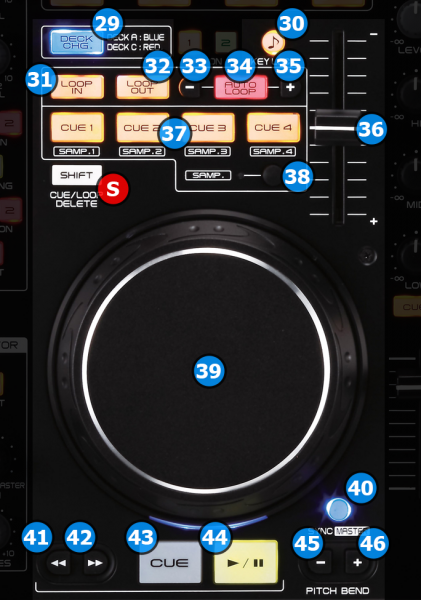
- DECK SELECT: Switch Left decks (1 and 3) and Right Decks (2 and 4). The left side of the MC6000 will control VirtualDJ decks 1 or 3, and the right side will control VirtualDJ decks 2 or 4.
- KEYLOCK: Press this button to "lock" the track's pitch to its current key. The track's tempo will be adjusted by the Pitch Fader (36).
Hold down SHIFT and tap this button 4 times to calculate a new BPM for the track.
- LOOP IN: Press this button to set a Loop In (Entry point).
Hold down SHIFT and then press this button to exit a loop.
- LOOP OUT: Press this button to set the Loop Out (Exit point).
Hold down SHIFT and then press this button to exit a loop.
- LOOP-: Press this button to half the size (in beats) of the Loop. If Sampler is active (Sampler Pad page is selected for this deck) press this button to select the previous sampler bank.
Hold down SHIFT and then press this button to move the loop backwards in beats as many beats as the current loop size.
- AUTOLOOP: Press this button to enable/disable a Loop of the selected size. If Sampler is active (Sampler Pad page is selected for this deck) press this button to select the next sampler mode for the sampler buttons.
Hold down SHIFT and then press this button to enable/disable smart loop. While smart loop is enabled, loop out points will be automatically adjusted so that your loop has a perfect length (in beats).
- LOOP+: Press this button to double the size (in beats) of the Loop. If Sampler is active (Sampler Pad page is selected for this deck) press this button to select the next sampler bank.
Hold down SHIFT and then press this button to move the loop forward in beats as many beats as the current loop size.
- PITCH: Adjust the track's playback speed (tempo).
The actual pitch fader will not alter the pitch of the track if the actual pitch and the software pitch value do not match (software soft-takeover, ghost fader visible on the GUI). In most cases this may happen if SYNC is prior pressed or switching decks and the other deck is having a different pitch software value.
- HOTCUE/SAMPLER BUTTONS: These 4 buttons offer a different function depending on the selected mode (38).
In HotCue mode the 4 buttons assign a Hot Cue Point (1 to 4) or return the track to that Hot Cue Point. When a Hot Cue Button is unlit, you can assign a Hot Cue Point by pressing it at the desired point on your track. Once it is assigned, the Hot Cue Button will light. To return to that Hot Cue Point, simply press the button again.
Hold down SHIFT and then press a Hot Cue Button to delete its assigned Hot Cue Point.
In Sampler mode, the 4 buttons will trigger a Sample from the selected Bank of VirtualDJ. If the selected bank has less than 5 samples (slots), both sides of the MC6000 will control the same samples. If a bank has more than 4 samples (slots), the left side of the MC6000 will control samples 1 to 4 and the right side samples 5 to 8.
Hold down SHIFT and then press a button to stop the corresponding sample (useful if the selected Sampler Trigger mode is set to Stutter or Unmute)
- HOTCUE/SAMPLER MODE: Use this button to select the HotCue or Sampler mode for the HotCue/Sampler buttons (37).
- JOG: Touch sensitive jogwheel. Use the jogwheel to scratch (if Vinyl mode is enabled) or pitch bend.
Hold down SHIFT and then use the jogwheel to fast seek through the track.
- SYNC: Press this button to automatically match the corresponding deck's tempo with the opposite deck's (or the Master deck’s if using a 4 decks skin) tempo and phase.
Hold down SHIFT and press this button to set this deck as Master Deck.
- SEARCH <<: Press this button to seek the track 4 beats backward. Press and hold this button to keep seeking the track backwards.
Hold down SHIFT and press this button to set the Jogwheel to Vinyl (Scratch) mode. In Vinyl mode, use the outer part of the Jogwheel to bend (temporary speed up – slow down) the tempo of the track.
- SEARCH >>: Press this button to seek the track 4 beats forward. Press and hold this button to keep seeking the track forward.
Hold down SHIFT and press this button to set the Jogwheel to CD (Bend) mode.
- CUE: When the deck is paused, you can set a Temporary Cue Point by moving the Platter to place the Audio Pointer at the desired location and then pressing the Cue Button.
During playback, you can press the Cue Button to return the track to this Temporary Cue Point. (If you did not set a Cue Point, then it will return to the beginning of the track.).
If the deck is paused, you can press and hold the Cue Button to play the track from the Temporary Cue Point. Releasing the Cue Button will return the track to the Temporary Cue Point and pause it. To continue playback without returning to the Temporary Cue Point, press and hold the Cue Button, then press and hold the Play Button, and then release both buttons.
- PLAY: Plays / Pauses the track.
- PITCH BEND-: Press and hold down this button to temporary slow down the song while the button is pressed. When released, the track playback will return to the speed designated by the Pitch Fader.
- PITCH BEND+: Press and hold down this button to temporary speed up the song while the button is pressed. When released, the track playback will return to the speed designated by the Pitch Fader.
Effects
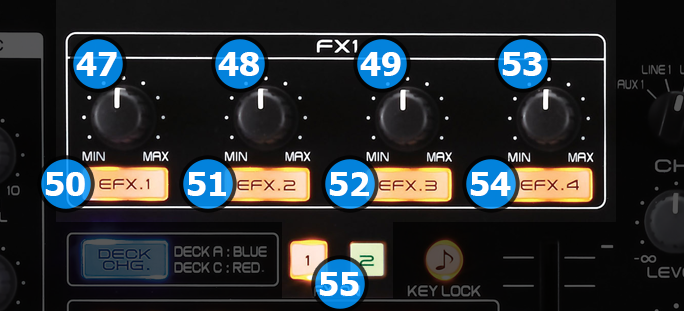
The Left FX section (
FX1) controls the effects of the currently selected
left deck (1 or 3) and the Right FX section (
FX2) controls the effects of the currently selected
right deck (2 or 4).
Use the
FX ASSIGN (55) buttons to copy the effects from one deck to another.
Each one of the FX unit offers 2 modes:
The
Single Effect mode offers one effect slot but more parameters controls per effect.
The
Multi Effects mode offers 3 effect slots (to trigger more than 1 effect at the same time – chained effects).
The selection between those 2 modes is done by pressing EFX4 (54) button while SHIFT is held.- EFX1 Knob:
In Single FX mode, turn this knob to select the current effect. Hold down SHIFT and turn this knob to adjust the 3rd parameter of the current effect (if available).
In Multi FX mode, turn this knob to adjust the 1st parameter of the effect in slot 1 (if available). Hold down SHIFT and turn this knob to adjust the 2nd parameter of the effect in slot 1 (if available).
- EFX2 Knob:
In Single FX mode, turn this knob to adjust the 1st parameter of the current effect (if available). Hold down SHIFT and turn this knob to adjust the 4th parameter of the current effect (if available).
In Multi FX mode, turn this knob to adjust the 1st parameter of the effect in slot 2 (if available). Hold down SHIFT and turn this knob to adjust the 2nd parameter of the effect in slot 2 (if available).
- EFX3 Knob:
In Single FX mode, turn this knob to adjust the 3rd parameter of the current effect (if available). Hold down SHIFT and turn this knob to adjust the 5th parameter of the current effect (if available).
In Multi FX mode, turn this knob to adjust the 1st parameter of the effect in slot 3 (if available). Hold down SHIFT and turn this knob to adjust the 2nd parameter of the effect in slot 3 (if available).
- EFX1 Button:
In Single FX mode, it activates the currently selected effect. Hold down SHIFT and press this button to enable/disable the 3rd button of the selected effect (if available).
In Multi FX mode, press this button to activate the effect selected on the 1st FX slot. Hold down SHIFT and press this button to select the next available effect for slot 1.
- EFX2 Button:
In Single FX mode, press this button to enable/disable the 2nd button of the selected effect (if available). Hold down SHIFT to control the 4th button of the selected effect (if available).
In Multi FX mode, press this button to activate the effect selected on the 2nd FX slot. Hold down SHIFT and press this button to select the next available effect for slot 2.
- EFX3 Button:
In Single FX mode, press this button to enable/disable the the 2nd button of the selected effect (if available). Hold down SHIFT to control the 5th button of the selected effect (if available).
In Multi FX mode, press this button to activate the effect selected on the 3rd FX slot. Hold down SHIFT and press this button to select the next available effect for slot 3.
- EFX4 Knob: Applies a High Pass / Low Pass resonant filter on the sound of the corresponding deck.
- EFX4 Button: Activates/Deactivates the resonant filter for the corresponding deck.
Hold down SHIFT and press this button to toggle between Single FX and Multi FX modes.
- FX ASSIGN: Clone the effects from one deck to another.
Quick Note:Not all effects offer multiple switches (buttons) and parameters (knobs) to adjust their behavior. Therefore it's absolutely normal that in
Single FX mode some buttons and / or knobs may do nothing when used.
Front

- HEADPHONES CONNECTOR: Connect your headphones.
- MIC 1 EQ: Adjust the EQ for MIC1 input (Hardware operation, not visible on the VirtualDJ GUI).
- MIC 2 EQ: Adjust the EQ for MIC2 input (Hardware operation, not visible on the VirtualDJ GUI).
- ECHO STRENGTH: Adjusts the amount of ECHO effect applied on MIC inputs. (Hardware operation, not visible on the VirtualDJ GUI).
- CROSSFADER CH ASSIGN: Define if a mixer channel will be output regardless of the position of the crossfader (THRU position) or Left/Right.
- CROSSFADER CURVE ADJUST: Adjusts the curve of the crossfader.
- STANDBY MODE CONTROL: Control whether the unit will enter automatically to standby mode / Wake up the device when it's on standby mode. Please refer to unit's manual for further information.
Rear

- DC INPUT: Connect the supplied PSU.
- POWER SWITCH: Turns on/off the power on the device. Please turn on the device only after doing and securing all connections on the back.
- USB CONNECTOR: Use a standard USB cable to connect MC-6000 with your computer.
- BOOTH OUT: Booth signal output (TRS – Balanced). The strength of the signal is controlled by “BOOTH/SEND LEVEL” knob (28) on the mixer section. Use it to connect your booth speakers, or an amp that needs different sound output level than master output.
- MASTER OUT1: Master signal output connectors (XLR – Balanced). Use this to connect on your pro grade amplifier or self-powered speakers.
- MONO/STEREO SWITCH: Controls whether the sound outputted on MASTER OUT1 connectors will be a stereo signal or a mono sum.
- MASTER OUT2: Master signal output connectors (RCA – Unbalanced). Use it to connect with another mixer, or consumer grade amplifier.
- REC OUT: Record signal output connectors (RCA – Unbalanced). Use it to connect with an analog audio recording device. The signal outputted on these connectors will be the same as the one on MASTER outputs. However it's strength is not affected by the MASTER VOLUME (27) knob adjustment.
- AUX IN 2: Use these inputs to connect an analog audio source that outputs LINE level signal.
- AUX IN 1: Use these inputs to connect an analog audio source that outputs LINE level signal.
- LINE IN 2: Use these inputs to connect an analog audio source. Use the LINE/PHONO (74) switch to control whether the connected device outputs LINE or PHONO level signal.
- LINE/PHONO SWITCH: Control whether the connected device on LINE 2 input outputs LINE or PHONO level signal.
- LINE IN 1: Use these inputs to connect an analog audio source. Use the LINE/PHONO (76) switch to control whether the connected device outputs LINE or PHONO level signal.
- LINE/PHONO SWITCH: Control whether the connected device on LINE 1 input outputs LINE or PHONO level signal.
- MIC 2 INPUT: Connect a mic. You can use only a Jack (TRS / TS) connector.
- MIC 1 INPUT: Connect a mic. You can use XLR or Jack (TRS / TS) connectors.
Advanced Setup
SOFTWARE VS HARDWARE MIXING
The Denon MC6000 offers 2 modes for it's USB Audio Output bus selected by the switcher
(B) at the rear side of the unit.
These modes can be selected/switched without re-launching VirtualDJ or power cycling the unit.
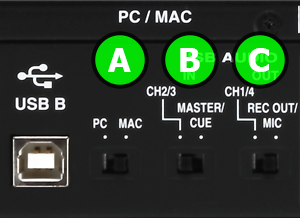
Fig1: MC6000 USB Bus Modes 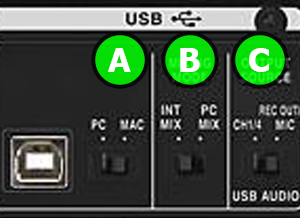
Fig2: MC6000 USB Bus Modes Default VirtualDJ audio setup will use "Software Mixing" (
Master/Cue or
PC Mix) modes.
In this mode 4 decks mixing is possible, and all audio mixing is done by VirtualDJ itself.
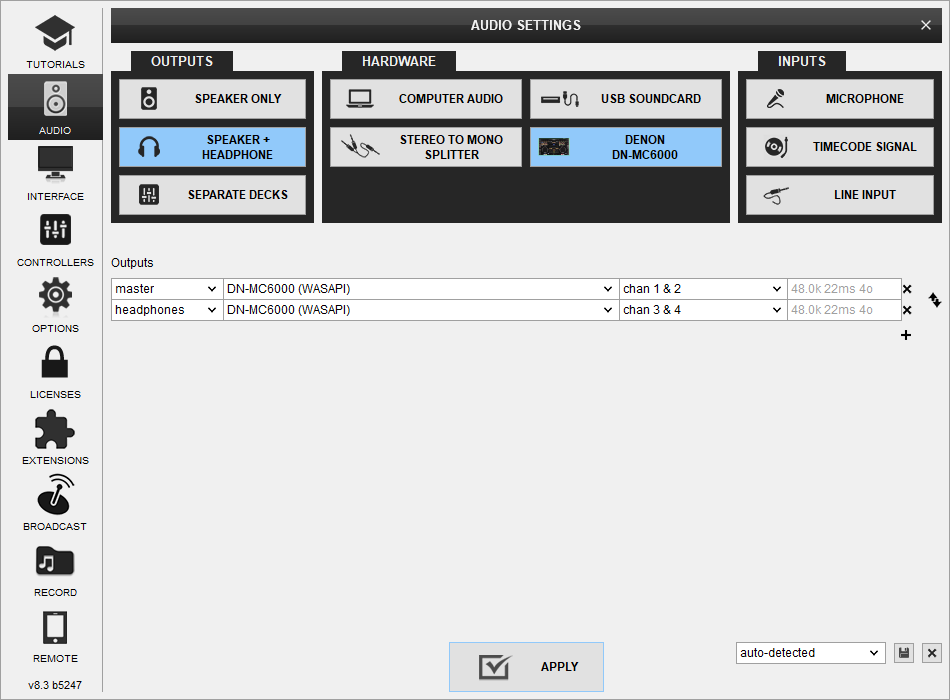
 Fig3: Default Audio Setup (Software Mixing) - Denon MC6000
 The second mode ((
CH2/3 or
INT Mix) allows the audio from VirtualDJ to be send directly on Channels 2 & 3 of the MC6000 mixer. In this mode the audio mixing is done by the MC6000 hardware mixer, and only 2 decks mixing is possible. In order to use this mode you need to modify the default audio setup as follows:
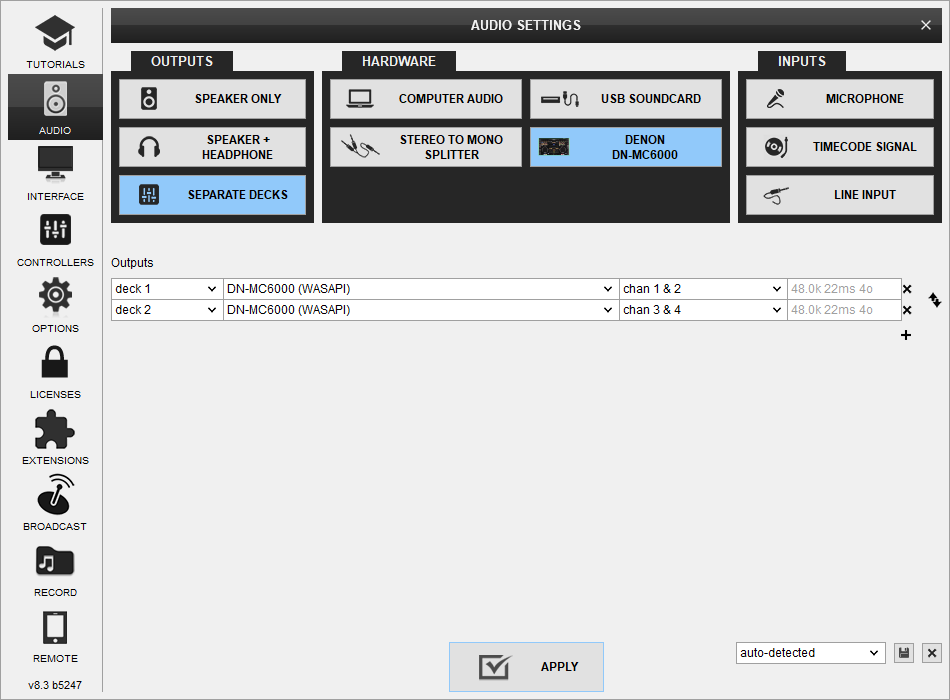 Fig4: Hardware Mixing - Denon MC6000
 RECORDING
The Denon MC6000 offers 2 modes for the USB Audio Inputs selected by the switcher
(C) at the rear side of the unit. These modes can be selected/switched without re-launching VirtualDJ or power cycling the unit.
Due to firmware limitations and driver stability issues only
REC OUT/MIC mode is supported.
In this mode the Default Audio Setup of this unit allows you to record the audio produced by VirtualDJ. The result recording file is a digital copy of the mixing done via VirtualDJ as it's send on the Master Output of the Denon MC-6000.
Since the MIC audio is not part of the digital bus interface (MIC audio is not processed by VirtualDJ) the result recording will not include the MIC sound.
If you want to include MIC sound on your recording, or you opt to use the HARDWARE 2 decks mixing mode mentioned above, you need to modify your audio setup in order to include a RECORD input:
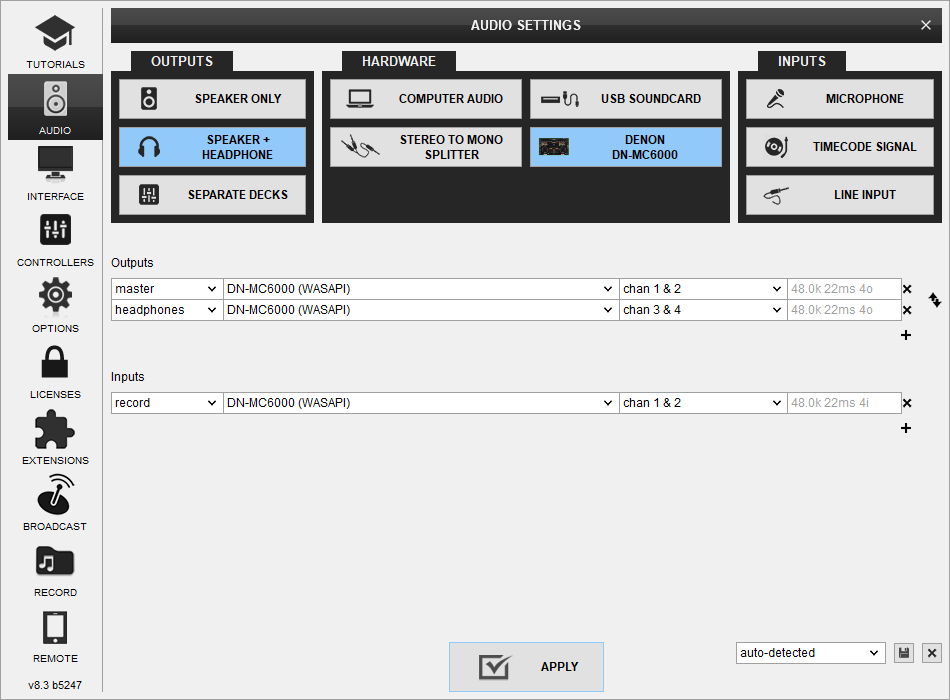 Fig5: Default Audio Setup (Software Mixing) with Record Input - Denon MC6000
 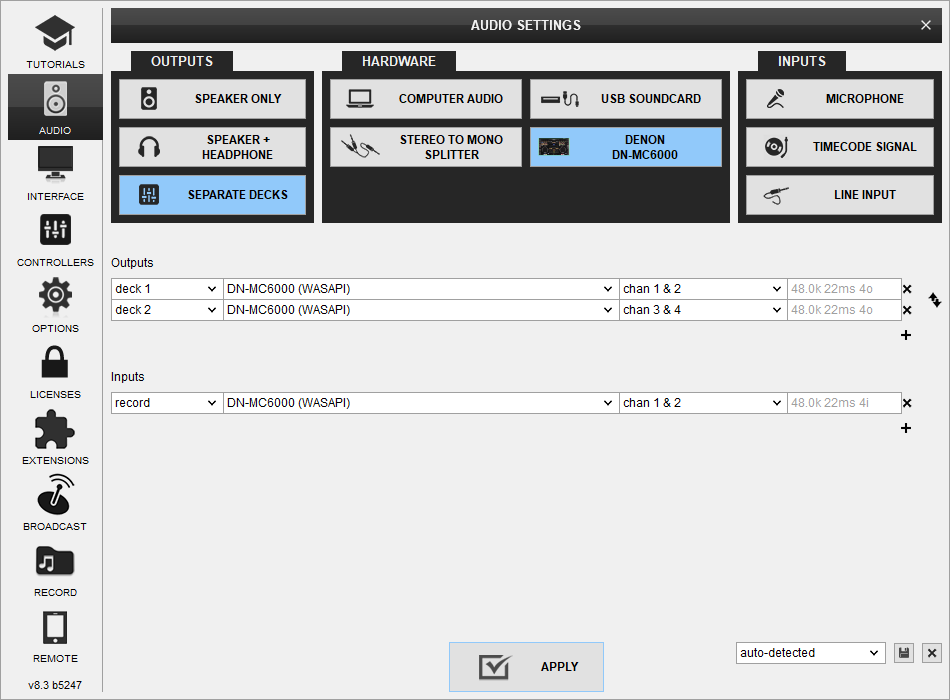 Fig6: Hardware Mixing with Record Input - Denon MC6000
 Hardware Integration Department 2019 - ATOMIX PRODUCTIONS Reproduction of this manual in full or in part without written permission from Atomix Productions is prohibited.